The DARwIn-OP2 robot is a small humanoid robot that was originally developed by RoMeLa (Robotics and Mechanisms Laboratory) in collaboration with a South Korean robotics company called Robotis.
DARwIn-OP (dark grey), DARwIn-OP2 (white)
The main scenarios in which a DARwIn-OP2 is used are:
Education
Outreach purposes
Research
The current NUbots team uses the DARwIn-OP2's for outreach events and education by providing in-depth talks and demonstration's at local schools, university events and more.
As time passed, the original DARwIn robot, called the DARwIn-OP, was later replaced with the DARwIn-OP2 to keep up with advancements in robotics technology and to help improve the limitations of the original OP.
Some limitations of the DARwIn-OP include:
Limited Hardware Capabilities
Battery life
Processor power
Computational power
Actuators (Dynamixel AX Series)
Motion and Balance
Speed of motion
Stability concerns
Software and AI
Vision
Perception
Compared to the DARwIn-OP2:
Hardware Capabilities
Improved battery life
Upgraded to Intel Atom N2600, faster and efficient
Upgraded to Dynamixel MX Series, higher torque, better durability and control
Motion and Balance
Better Balance
More stable
Software and AI
Enhanced vision processing software
More accurate ball detection
DARwIn-OP2 Specifications
Mainboard: PICO-CV01
Cpu: Intel Atom N2600 @1.6GHz single core
Ram: Up to 4GB DDR3/240-ping SO-DIMM module (user replaceable)
Linux mint 17.3 'Rosa' installed on PICO-CV01 board
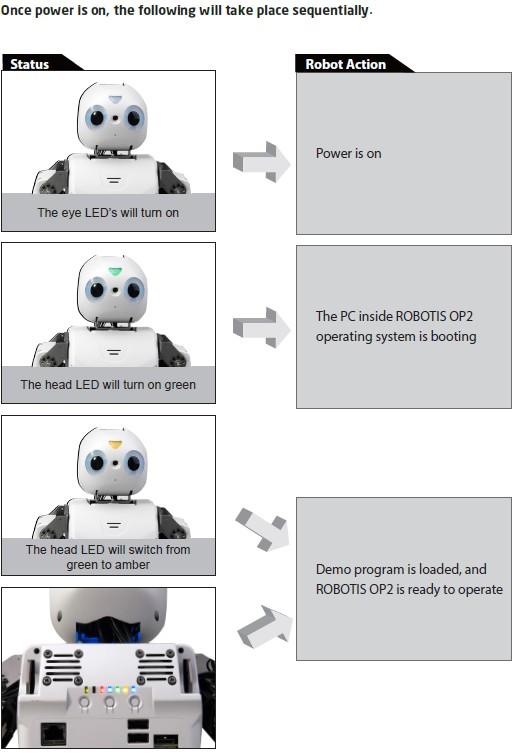
Powering on the DARwIn-OP2
To power the DARwIn-OP2, following these steps:
Position the DARwIn-OP2 into the ready position.
Photo from Robotis of the ready position.
Make sure you have put the DARwIn into this starting position. Any other position may result in major damage to the robot.
Connect the 12V DC power supply connector into the DC jack located at the back of the robot.
Photo from Robotis of the location where the DC connector belongs.
Make sure the power supply you are using is exactly 12V. Any other power supply may result in major damage to the robot.
Plug the power supply into the wall socket and flip the switch to on. After this, turn the DARwIn-OP2 power switch on. This is located to the right of the DC jack.
Photo from Robotis of the power switch.
Once the DARwIn-OP2 has booted, the starting position will go stiff and the back panel will light up with different LED colours.
Photo from Robotis of the boot sequence.
Running the demonstration programs on the DARwIn-OP2
There are different types of operation modes for the DARwIn-OP2.
To switch between modes: press the MODE button.
To start each mode: press the START button.
To reset the actuators and sub-controller, press the RESET button.
WARNING: Upon pressing the RESET button, torque will be released on ALL of the actuators causing the DARwIn-OP2 to go limp.
Be careful when handling.
Photo from Robotis of the buttons upon the DARwIn-OP2.
Demonstration-ready mode
This is the default mode when the DARwIn-OP2 is fully booted and is in the seated position.
The LEDs on the back panel will light up in the sequence: LED 1 (red), LED 2 (blue), and LED 3 (green).
Photo from Robotis of the demonstration-ready mode LEDs.
Autonomous soccer mode
This mode gives the DARwIn-OP2 the ability to follow and kick a soccer ball. The head camera will follow the ball while the legs move along to follow.
While in this mode, the robot may fall. This is not an issue because the DARwIn-OP2 is programmed to recover by pulling itself from the floor.
If the DARwIn-OP2 is in this mode, the LEDs on the back will light up in the sequence: LED 1 (red).
Photo from Robotis of the autonomous soccer mode LEDs.
Interactive motion mode
This mode allows the DARwIn-OP2 to perform pre-programmed motions.
Photo from Robotis of the pre-programmed motions.
if the DARwIn-OP2 is in this mode, the LEDs on the back panel will light up in the sequence: LED 2 (blue).
Photo from Robotis of the interactive motion mode LEDs.
Vision processing mode
This mode allows the DARwIn-OP2 to observe coloured cards to perform motions based upon them.
Photo from Robotis of the coloured cards.
These coloured cards can be downloaded at the SourceForge website.
Cards are kept in the DARwIn case.
If the DARwIn-OP2 is in this mode, the LEDs on the back panel will light up in the sequence: LED 3 (green).
Photo from Robotis of the vision processing mode LEDs.
Creating the recovery USB
Creating a recovery USB is helpful in many ways.
The ways that we are focusing on are:
Reflashing a DARwIn-OP2 robot, if there are problems with the software.
For first time flashing of the demo code for a new DARwIn robot.
Download Tuxboot from the SourceForge website. For this demonstration we will be downloading the Linux version.
Navigate into the 0.6 folder.
Navigate into the Linux folder.
Tuxboot is a very helpful tool that creates bootable USB drives. By downloading Tuxboot from SourceForge, we can prepare a USB for recovery.
When the first step is complete, run Tuxboot 0.6.
Photo from Robotis of the Tuxboot application.
Running Tuxboot helps prepare the USB drive for the Clonezilla software.
Click onto the 'Files' tab, then select 'clonezilla_live_stable'.
Navigate into the files tab.
This will then direct you to a tab filled with different clonezilla versions. What we are looking for is the 'OldFiles' section.
Navigate into the the old files folder.
Clicking into this, we now need to look for the section called '2.0.1-5' (in the following picture, it is the middle option).
Navigate into the folder 2.0.1-5.
In this folder, we need to download 'clonezilla-live-2.0.1-5-i486.iso'.
Choose the middle option.
Clonezilla is a recovery tool which allows the user to create or restore disk images. This software is essential for recovering the DARwIn-OP2 system.
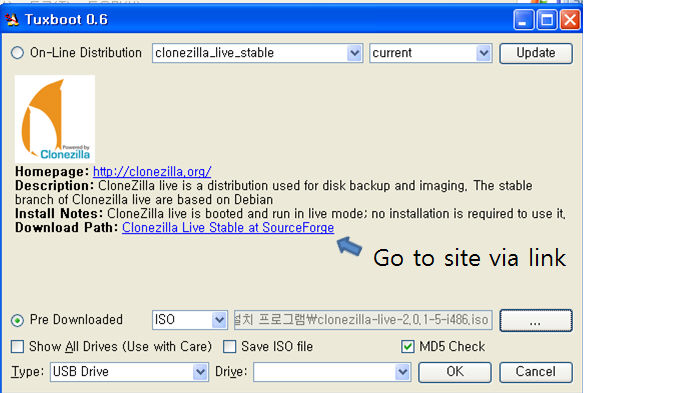
When you have successfully downloaded Clonezilla, reopen Tuxboot. Then select the pre-downloaded option on screen.
Select the 'clonezilla-live-2.0.1-5-i486.iso' from your files. Make sure you have ISO selected in the drop-down menu, for the 'Type' selection, pick USB and tick the MD5 check box.
Photo from Robotis of the Tuxboot application.
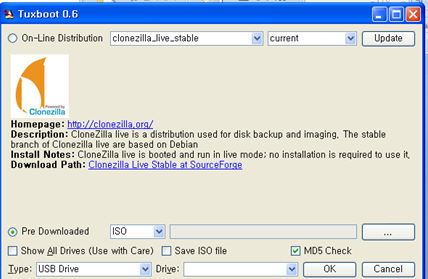
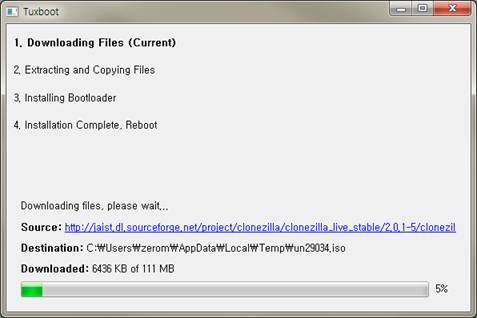
After you have done this step, press 'OK' and let the program run.
Photo from Robotis of Tuxboot downloading the necessary files.
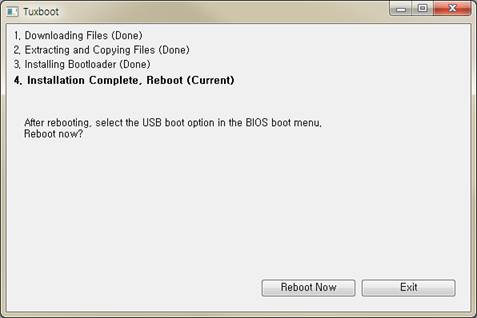
Once this is complete press 'Exit'.
Photo from Robotis of the completed process.
Using Tuxboot and selecting the Clonezilla ISO, the user has now created a bootable USB drive which is ready for the recovery files.
This completes the Clonezilla portion of this recovery USB.
Now that you have successfully created a Clonezilla USB, we now need to put the recovery software onto it. This is done by following the instructions below.
Open your USB in your files but leave this for now and go to SourceForge.
We now need to download the DARwIn recovery files. For this example, we are downloading the ROBOTIS-OP2_Recovery_20150326.zip.
Choose the middle option.
After this has finished downloading, we need to create a home folder in our USB. When you have created such folder, click into it and create another folder called partimag, then click into it.
Leave this for the time being.
Now, go into your downloads and locate your ROBOTIS-OP2_Recovery_20150326.zip, unzip the file and click into it.
The process should look like this.
Select all these files and move them into your partimag folder (i.e.
USB / home / partimag).
The user must download the recovery files from SourceForge and move them into the correct places before flashing the DARwIn-OP2.
You have now completed the ‘creating the recovery USB’ section successfully!
Running the recovery USB through the BIOS
Now that we have a recovery USB created with all the right files placed upon it, it is now time to run it on the PICO-CV01 board.
Boot up your PICO-CV01 in the BIOS menu (this is usually done by pressing either f12 or delete), locate the boot tab and search for boot sequence.
Select the Clonezilla USB as the first selection for the sequence, save the changes and restart.
Once this restarts, Clonezilla should boot up straight away.
When Clonezilla boots, a menu screen will appear. Execute the following instructions:
Clonezilla
Select the default option 'Clonezilla live (default settings. VGA 800x600)'
Language
Choose language 'Whichever is your preferred language'
Configuring Console-data
Select default option 'Don't touch keymap'
Start Clonezilla
'Start_Clonezilla Start Clonezilla'
Clonezilla
Select default option 'device-image work with disks or partitions using images'
Mount Clonezilla Image Directory
Select the following 'skip Use existing/home/partimag (Writable device. E.g. hard disk/USB drive)'
Clonezilla - OpenSource Clone System (OCS)
Select the following 'Beginner Beginner mode' then 'Accept the default options'
Clonezilla Select mode
Select the following 'restoredisk Restore_an_image_to_local_disk'
Clonezilla - OpenSource Clone System (OCS)
Choose the image file to restore 'this will be your recovery image'
Clonezilla - OpenSource Clone System (OCS)
Choose the target disk 'this will be your SSD (make sure to check your SSD capacity to see if the recovery files will fit!)'
Starting to Restore Image to Device
Wait until this is complete.
Completed Restoration
Press enter to continue
Power Off or Reboot
Select one of the following options '(0) Power Off, (1) Reboot'
When the DARwIn-OP2 has successfully shut down, remove the USB and reboot the robot.
If the DARwIn-OP2 is unable to track the ball well, then vision needs calibrating.
Using a portable monitor, plug in a HDMI to mini HDMI cable (mini is to be connect to the DARwIn-OP2, normal HDMI being connected to the monitor).
Do not power the monitor from the DARwIn-OP2.
Start the DARwIn-OP2 so the standard demo program is running. Once booted, it should be in the initial sitting pose.
Connect a keyboard and mouse to the DARwIn-OP2.
Once you are connected to the DARwIn-OP2, use a browser (e.g. Chrome or Firefox) to talk to the robot. The web address should be (http://192.168.123.1:8080/).
While on this web address you should see the camera's live feed, with camera parameters on the side and bottom of image.
The important parameter is the orange ball, which can be found in the DARwIn transport case.
You will see the section of the camera view highlight pixels in orange, this is showing you an output of its applied colour lookup table for the ball. You don't want too many of these random
pixels around if there is no ball in front of the robot, but once you place a ball in front of the robot, it should see it with the orange applied over the ball.
Once you are happy with the calibration, press save and exit the program.
Start the DARwIn-OP2 in the initial sitting pose and wait until the robot is fully booted. Once booted, run a terminal in the DARwIn-OP2's desktop interface.
In the terminal, stop the demo binary (as it boots from the start) by using sudo pkill demo.
Change the current directory to the walk tuner directory: cd/robotis/Linux/project/walk_tuner/
Run the walk tuner by running the command: ./walk_tuner
While on this terminal, a prompt will ask for the user to press any key to start the tuner. After this, a browser will be needed to access the parameters to tune: (http://192.168.123.1:8080/).
Once on this browser, you will see different options to tune. You can change these until you are happy with the walk.
Some of the important options that have been used previously are gains, PID controller, step height, DSP ratio, and duty cycle.
Once you are happy, press save and exit the program.
NUbots acknowledges the traditional custodians of the lands within our footprint areas: Awabakal, Darkinjung, Biripai, Worimi, Wonnarua, and Eora Nations. We acknowledge that our laboratory is situated on unceded Pambalong land. We pay respect to the wisdom of our Elders past and present.