Flashing a Robot
To install Arch Linux (our OS of choice) on to a robot perform the following instructions. Make sure you know the robot number for this NUC before beginning.
Find the arch linux archive date in the mirrorlist for our dockerfile, go to that date in the Arch Linux Archive ISO page, download
archlinux-x86_64.isoand burn it onto a USB thumb drive using the following instructions- Find the USB drive in your system. This will vary from one system to another and choosing the wrong drive will cause irreversible data loss.
- Use
sudo fdisk -l, or theDisksGUI program to find your USB drive. It will probably be/dev/sdX, whereXis a letter of the alphabet.
- Use
- Burn the Arch Linux ISO you just downloaded to the USB drive (in this example we are using
/dev/sdb) - sudo dd bs=4M if=~/Downloads/archlinux-2022.07.10-x86_64.iso of=/dev/sdb status=progress oflag=sync
- Find the USB drive in your system. This will vary from one system to another and choosing the wrong drive will cause irreversible data loss.
If you are using a brand new NUC, Boot into the BIOS on the NUC
- Turn the NUC on and hold down the F2 button
- Intel Visual BIOS should appear
- Navigate to "Advanced" menu
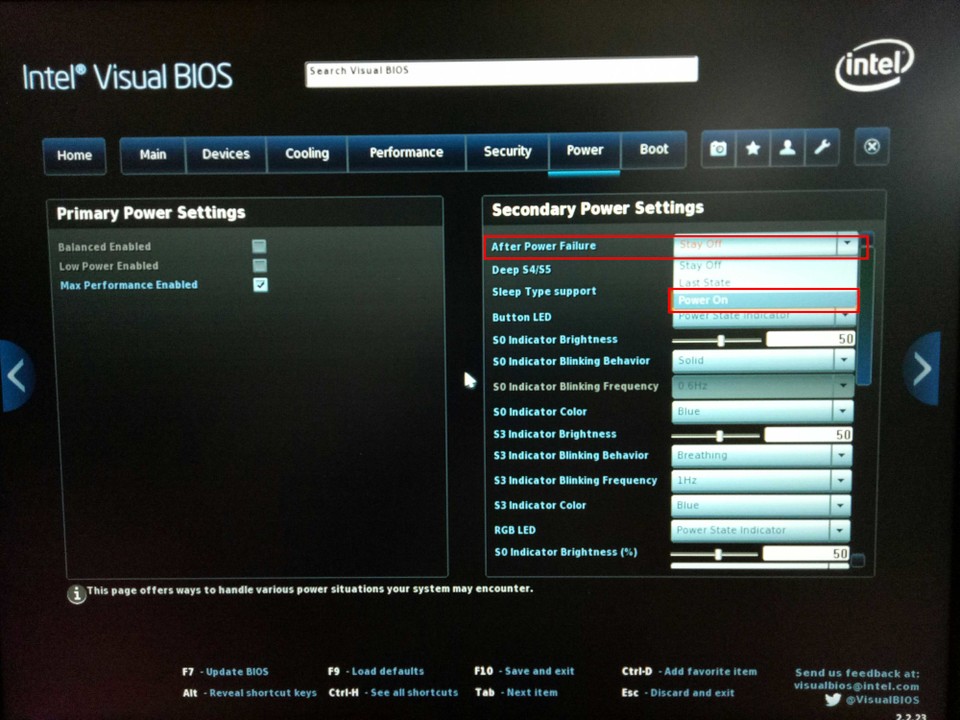
- Navigate to "Power" then set "After Power Failure" to "Power On"
![BIOS Power Menu]()
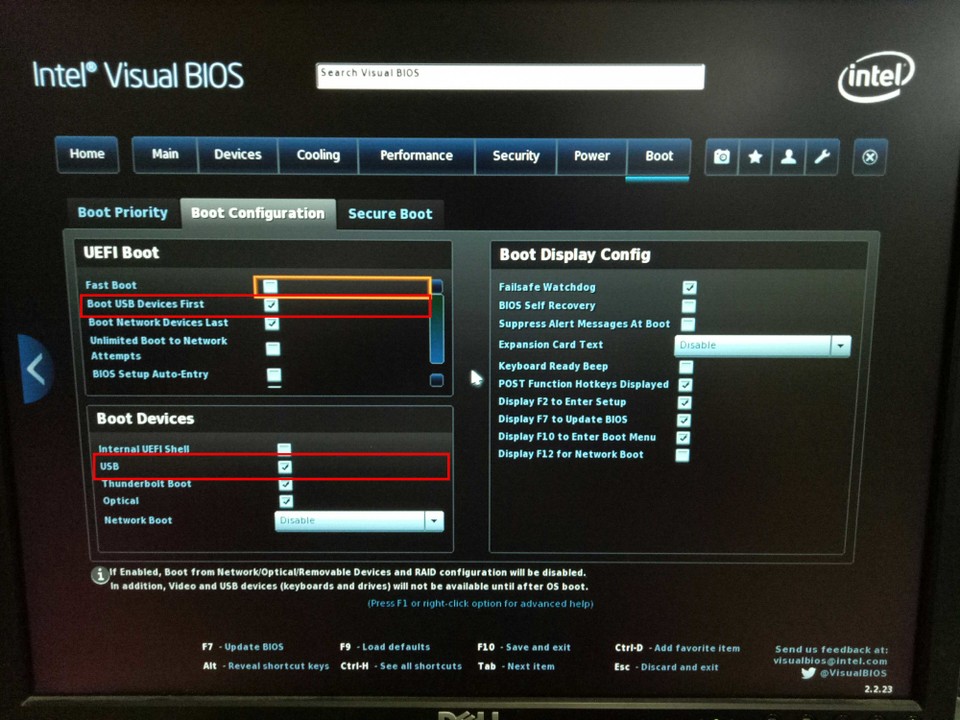
BIOS Power Menu - Navigate to "Boot" and then "Boot Configuration"
- Ensure "Boot USB Devices First" is enabled in "UEFI Boot"
- Ensure "USB" is enabled in "Boot Devices"
![BIOS Boot Configuration Menu]()
BIOS Boot Configuration Menu
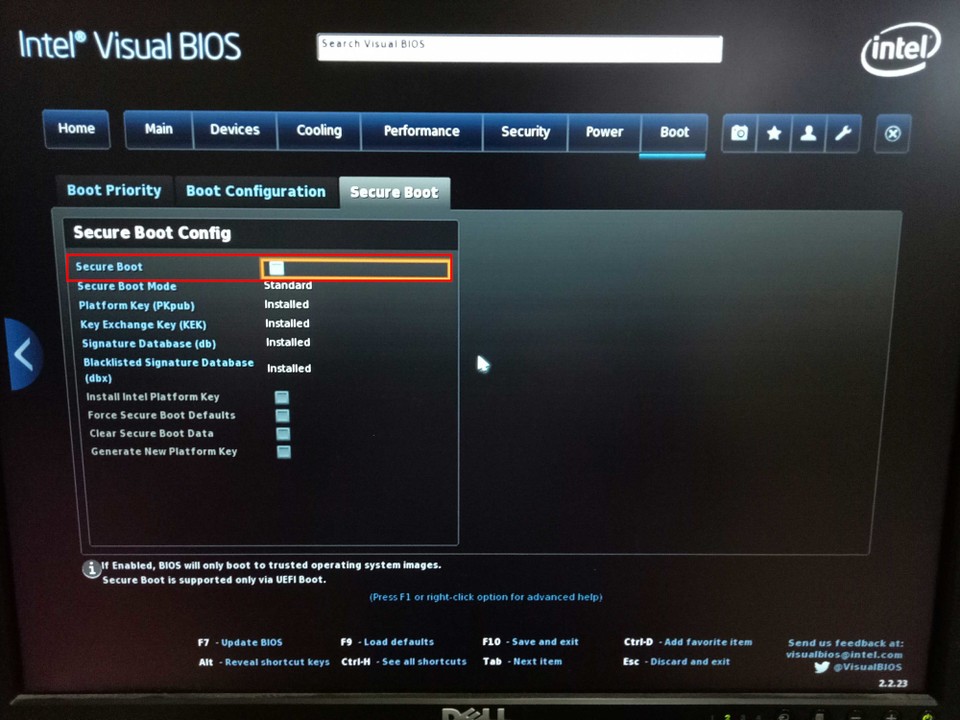
- Navigate to "Secure Boot" and disable "Secure Boot"
![BIOS Secure Boot Menu]()
BIOS Secure Boot Menu - Press F10 to save settings and exit and ensure you USB drive is plugged in
If you are not using a brand new NUC, ensure your USB drive is plugged in and turn the NUC on
Once the system has booted into the LiveUSB environment on the robot, ensure the robot has an active network connection
![LiveUSB Environment]()
LiveUSB Environment Run
ip addrand look for ainetline that has a valid IP address on it. If you can't see one you don't have a network connection. Alternatively, runping -c 3 google.comand look for a response time.![Internet connection]()
Internet connection ![No internet connection]()
No internet connection If you have no connection and need to set up the WiFi interface, see below.
Download the installation script https://git.io/JeWaF and make sure the script is executable
- curl -L https://git.io/JeWaF -o ./arch_install.shchmod +x ./arch_install.sh
- The installation script is located in the NUbots repository at doc/ArchInstall/arch_install.sh
Execute the script and follow the instructions
- ./arch_install.sh
The installation script will end by downloading a secondary script and providing you with a command that you must run
ROBOT_NUMBER=<N> arch-chroot /mnt ./arch-chroot_install.shSubstitute
<N>with the number of the robot that you are building. This will influence the IP address of the robot as well as the robots' hostname.The secondary script assumes that the network interfaces are named
eth0for ethernet andwlp58s0for WiFi. If you know this is not the case then execute the script as followsROBOT_NUMBER=<N> \ETHERNET_INTERFACE=IF_NAME \WIFI_INTERFACE=IF_NAME \arch-chroot /mnt ./arch-chroot_install.shOnce that script has finished, run the following command.
/mnt/arch-post_install.shThis command will end by rebooting the robot. When this happens be sure to remove the USB installation drive from robot so that you may boot into the new system.
The other two scripts can be found at doc/ArchInstall/arch-chroot_install.sh and doc/ArchInstall/arch-post_install.sh
Finally, we need to run the
SystemConfigurator.Make sure you have built the
system_configurationrole and run./b install n<N>Where
<N>is again replaced with the robot number.Now ssh into the robot and run
./system_configuration
Testing the new robot
Once installation is complete and you have booted into your shiny new OS, you should perform a couple of simple tests to ensure everything is operational.
First, login to system

Now check for a network connection, the same as we did before. If ip addr indicates that there is no connection then it is likely that the secondary installation script made the wrong guess about the name of the network interfaces. Inspect the output from ip link and make note of the ethernet and wifi interface names.
It is possible that ip addr will show a valid IP address for bond0, but ping -c 3 google.com and ping -c 3 8.8.8.8 will indicate that there is no network connection.
If there is no connection, then the following files need to be modified (using either sudo nano or sudo vim)
/etc/systemd/network/20-ethernet.network/etc/systemd/network/30-wifi.network/etc/systemd/network/99-ethernet.network/etc/systemd/network/99-wifi.network/etc/wpa_supplicant/wpa_supplicant-wlp0s20f3.conf
These 5 files need to be edited. Specifically, the value of Name should correspond with the interface name of the device being targeted. On the Nuc 12 this is enp86s0 for ethernet and wlp0s20f3 for wifi.
Next, correct the wpa_supplicant service by running
sudo systemctl disable wpa_supplicant@wlan0sudo systemctl enable wpa_supplicant@new_interfaceBe sure to replace new_interface with the name of the WiFi interface.
Once these files have been fixed, reboot by typing sudo systemctl reboot and then login again. Hopefully, ip addr indicates that there is an active network connection (on bond0) and ping -c 3 google.com also indicates an active connection.
Manually setting up a WiFi connection on the robot
To set up the WiFi interface you first need to know the name of the interface. To find this, run
ip link
and look for an interface starting with wl. On our robots it is usually wlan0.
The rest of these instructions assume a network using WPA2 (like the network used in the NUbots lab).
Make sure the
wpa_supplicantconfiguration directory exists- mkdir -p /etc/wpa_supplicant
Setup the network configuration
- wpa_passphrase <Network SSID> <Network Passphrase> > /etc/wpa_supplicant/wpa_supplicant-<WiFi Interface>.conf
- Be sure to replace
<Network SSID>with the SSID of the wireless network to connect to (eitherepsilon-xorepsilon-zin the lab),<Network Passphrase>with the password for the network (ask someone for the lab password if you don't know it), and<WiFi Interface>with the name of the interface found earlier.
Now start all of the necessary services
- systemctl start dhcpcd.servicesystemctl start wpa_supplicant.servicesystemctl start wpa_supplicant@<Wifi Interface>.service
- Be sure to replace
<WiFi Interface>with the name of the interface found earlier. - Wait a handful of seconds and run
ip addrto check that the WiFi interface has an IP address


