Onboarding Workshop
The onboarding workshop aims to teach new members about NUClear, and engage in coding with C++. Prerequisites such as Git, VS Code, etc. need to be set up before moving forward with this task. See the Getting Started page for more details.
Terminology
Role
A Role is a file that defines the desired purpose or functionality of the binary/program we want to compile. A role file lists what modules we want included in our program/binary.
This is an example of a role file:
nuclear_role( extension::FileWatcher support::logging::ConsoleLogHandler actuation::KinematicsConfiguration platform::${SUBCONTROLLER}::HardwareIO input::SensorFilter extension::Director actuation::Kinematics actuation::Servos onboarding::Ping onboarding::Pong onboarding::Judge)Messages
A message is called a neutron. It is essentially a .proto file. When a role is built, the proto file is compiled into C++, and so it is imported as a .hpp C++ header file.
For example, the Ping.proto file looks like:
syntax = "proto3";
package message.onboarding;
message Ping { int32 val = 1; int32 iter_count = 2;}It should be imported as #include "message/onboarding/Ping.hpp". This message can hold a 32-bit integer variable named val and iter_count. All messages are stored in folder shared/message.
Modules
Modules respond to and send information into the system using messages. They use the emit() function to send messages and on<DSL<message>>() functions to respond to them.
Consider the following example Ping module:
#include "Ping.hpp"
#include "extension/Configuration.hpp"
#include "message/onboarding/Ping.hpp"#include "message/onboarding/Pong.hpp"
namespace module::onboarding {
using extension::Configuration;
Ping::Ping(std::unique_ptr<NUClear::Environment> environment) : Reactor(std::move(environment)) {
using message::onboarding::Ping; using message::onboarding::Pong;
on<Configuration>("Ping.yaml").then([this](const Configuration& config) { // Use configuration here from file Ping.yaml this->log_level = config["log_level"].as<NUClear::LogLevel>(); });
on<Trigger<Pong>>().then([this](const Pong& pong_msg) { auto ping_msg = std::make_unique<Ping>(); log<INFO>("Ping"); emit(ping_msg); }); }
} // namespace module::onboardingLet's dive into what's going on within this module:
At the top of a module, we include the necessary header and message files:
#include "Ping.hpp"#include "extension/Configuration.hpp"#include "message/onboarding/Ping.hpp"#include "message/onboarding/Pong.hpp"Next, the module is defined as a class that inherits from the NUClear environment. It is essentially the module itself:
namespace module::onboarding {using extension::Configuration;Ping::Ping(std::unique_ptr<NUClear::Environment> environment) : Reactor(std::move(environment)) {using message::onboarding::Ping;using message::onboarding::Pong;Within the Pong module are the
onfunctions that were mentioned earlier:on<Configuration>("Ping.yaml").then([this](const Configuration& config) {// Use configuration here from file Ping.yamlthis->log_level = config["log_level"].as<NUClear::LogLevel>();});on<Trigger<Pong>>().then([this](const Pong& pong_msg) {auto ping_msg = std::make_unique<Ping>();log<INFO>("Ping");emit(ping_msg);});on<Configuration>is used to load in configuration values from filePong.yamlon<Startup>()runs just once when the module startson<Trigger<Ping>>()runs whenPingmessage is received and prints "Ping"
The log<INFO>("Ping"); can be thought of as the equivalent of an std::cout in normal C++ or a print in python. There are various types that can be used for logging information. See NUbook for more information.
Task: Git Branching
A branch is your own workspace where you can make changes and implement new features. It is a good practice to create a new branch for each new feature you are working on. This way, you can work on multiple features at the same time without affecting the main codebase.
Open a terminal in your
NUbotsdirectory and checkout the branchmontano/onboardingby runninggit checkout montano/onboardingThis branch has a role
onboarding.roleand modulePingalready created for you.Now create your own branch which extends from this by running
git checkout -b <your-last-name>/branching-task
Don't be afraid to break things in your own branch! It will not directly impact the main branch.
VS Code Git Extension
There exists many GUI tools for using Git which can make your life easier, for example VS Code, Github Desktop or GitKraken.
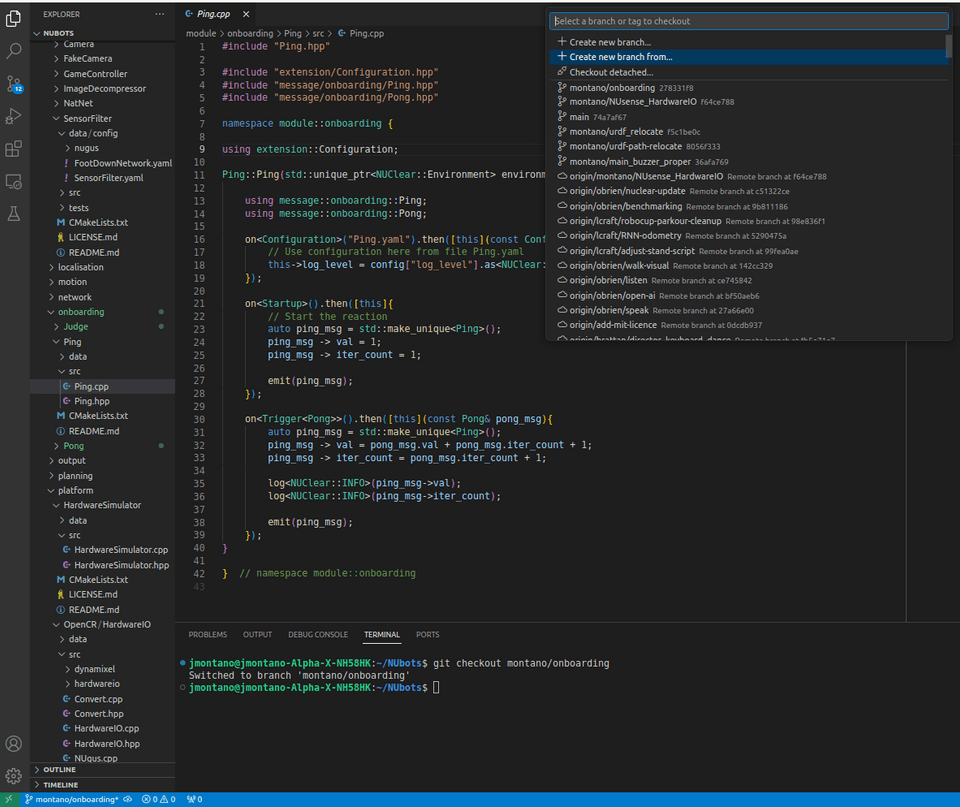
In VS Code, you can create your own branch by clicking on the button on the bottom left hand side, which is the name of the branch that you are currently on.
To create a new branch using the VS Code Git extension:
Click on the button in the bottom left hand corner of the screen containing the name of the current branch.
If you have correctly done the git checkout command, then you should be in the
montano/onboardingbranch.Select
Create new branch from...and entermontano/onboarding. This will create a new branch starting from themontano/onboardingbranch.![Create new branch from]()
Enter a branch name which should follow convention
<your-last-name>/<branch-name>, where branch name should be something clear and simple.
Task: Creating messages and modules
You should see the Ping module already implemented in NUbots/module/onboarding.
Currently, this code will not compile because a Pong message doesn't exist, so let's create it.
Navigate to
NUbots/shared/message/onboarding, duplicatePing.protoand rename it and its contents toPong.You should have a new file
Pong.protoin folderNUbots/shared/message/onboardingwith contents:syntax = "proto3";package message.onboarding;message Pong {}Ensure that the code now compiles by running:
./b configure --clean./b configure -iThis opens the interactive configuration menu. Enable the roles you want to build and disable the ones you don't by highlighting them using the ↑ and ↓ arrow keys and pressing the spacebar to toggle on and off. Limiting the roles to only the ones you are working on will speed up the build process significantly.
Press c to configure. Once configuration has finished, press g to generate the build list. Press e to exit if it has not automatically returned you to the terminal. Now complete the build by running
./b buildWe will now create the
Pongmodule which sends out aPongmessage. Run the following script to generate a template module:./b module generate onboarding/PongNavigate to
NUbots/module/onboarding/Pongand populate thePong.cppfile with the following code and implement the TODO's:#include "Pong.hpp"#include "extension/Configuration.hpp"#include "message/onboarding/Ping.hpp"#include "message/onboarding/Pong.hpp"namespace module::onboarding {using extension::Configuration;Pong::Pong(std::unique_ptr<NUClear::Environment> environment) : Reactor(std::move(environment)) {using message::onboarding::Ping;using message::onboarding::Pong;on<Configuration>("Pong.yaml").then([this](const Configuration& config) {// Use configuration here from file Pong.yamlthis->log_level = config["log_level"].as<NUClear::LogLevel>();});on<Startup>().then([this] {// Start the ping pong chainauto pong_msg = std::make_unique<Pong>();emit(pong_msg);});on<Trigger<Ping>>().then([this](const Ping& ping_msg) {// TODO: Log a INFO level message with the text "Pong"// TODO: Emit a Pong message});}} // namespace module::onboardingAdd this module to the role file
onboarding.rolelocated in folderNUbots/roles/test. Its contents should then look like:nuclear_role(# FileWatcher, ConsoleLogHandler and Signal Catcher Must Go First. KinematicsConfiguration usually goes after these# and without it many roles do not runextension::FileWatchersupport::SignalCatchersupport::logging::ConsoleLogHandler# This must come first as it emits config which many roles depend on (e.g. SensorFilter, WalkEngine)actuation::KinematicsConfigurationplatform::${SUBCONTROLLER}::HardwareIOinput::SensorFilterextension::Directoractuation::Kinematicsactuation::Servosonboarding::Pingonboarding::Pong)Compile and run the program by running
./b configure./b build./b run test/onboardingOnce the code is compiling and you are happy with it, commit and push your changes to the cloud by running
git add -A # Add all changed files to the commitgit commit -m "Add pong module" # Commit the changes with a messagegit push # Push the changes to the cloud
Reactors are started in the order that is stated in the role file. Suppose that the startup function within Ping contains the initial emit message but it goes before Pong in the role document, the initial message can be emitted before the reactor Pong is initialised.
Task: Add property to a message
At this point, we have a Ping and Pong module and their corresponding messages which communicate with one another, however the messages lack any information.
Update the
Pingmessage following the template below:syntax = "proto3";package message.onboarding;message Ping{// TODO: Fill this message with an int32 field named "count". What should its tag be?// HINT: Look at the format of other proto messages in the code base for reference.}
Protocol Buffers (protobuf) is a sophisticated library for serialisation, deserialisation and compression of information. We cannot discuss its entirety here but do note that we treat protobufs as data that gets passed around in the system during runtime.
Update the
Pingmodule to increment the counter every time aPongmessage is received.Emit this message with the incremented value and display this value using a
logcommand within thePongmodule.
Below is a template of how you might structure the Ping module:
#include "Ping.hpp"
#include "extension/Configuration.hpp"
#include "message/onboarding/Ping.hpp"#include "message/onboarding/Pong.hpp"
namespace module::onboarding {
using extension::Configuration;
Ping::Ping(std::unique_ptr<NUClear::Environment> environment) : Reactor(std::move(environment)) {
using message::onboarding::Ping; using message::onboarding::Pong;
on<Configuration>("Ping.yaml").then([this](const Configuration& config) { // Use configuration here from file Ping.yaml this->log_level = config["log_level"].as<NUClear::LogLevel>(); });
on<Trigger<Pong>>().then([this](const Pong& pong_msg) { auto ping_msg = std::make_unique<Ping>(); ping->count = ????; // TODO: Assign counter value. log<INFO>("Ping"); emit(ping_msg); }); }
} // namespace module::onboardingTask: Create a pull request
This section contains information about how to open a pull request. First, create your branch and name it. It should be in the format of author(s)/this-code-does-this. It is ideal to keep it intuitive and simple. Run git checkout montano/onboarding to push to this branch before doing anything else. Follow the images below to create a pull request that pushes to the montano/onboarding branch in NUbots/NUbots.
Checkout to the branch that you have created (the one created from
montano/onboarding). Once in the branch, click the cloud with an arrow pointing up on the bottom left hand side of VS Code. If you hover over it, you should be able to see "Publish Branch". Click on it.![Publish Branch]()
If you were not able to publish your branch successfully, you will likely need write access to the repository to be granted by an admin (usually the team leader). Send a DM to the team leader or ask in the #general channel on Slack to request access.
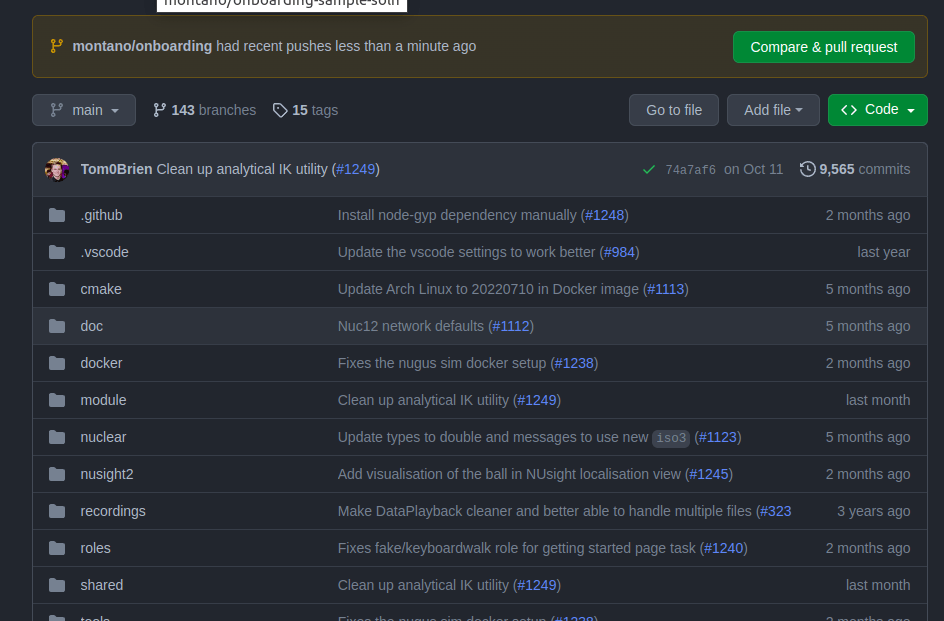
Go to the page for the
NUbots/NUbotsrepository. A popup with a "Compare and Pull request" button should be visible after successful publishing. Click on it.![Compare and Pull Request]()
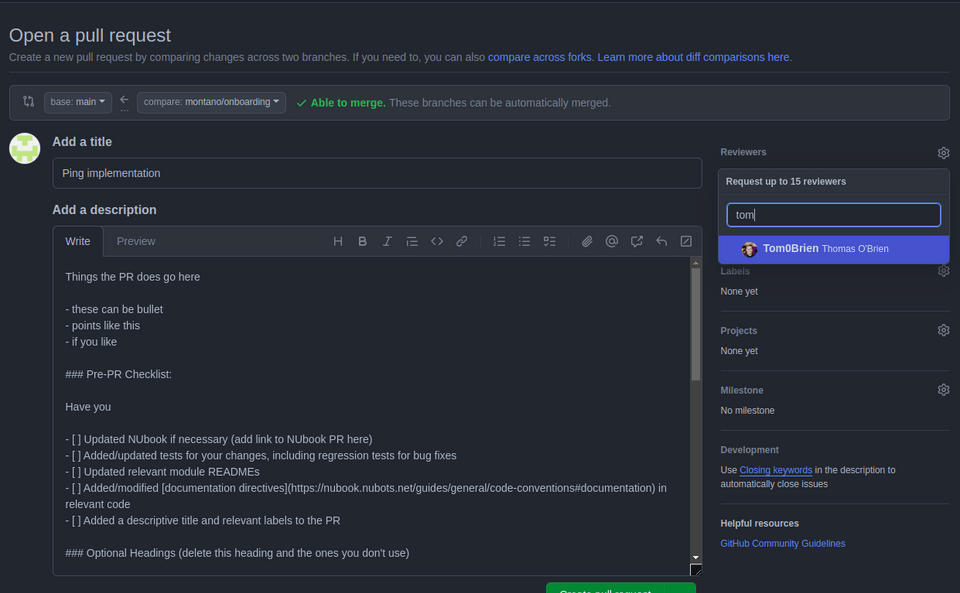
Fill in the details to create a pull request.
- Assign a proper name to your pull request. It should be informative and describe exactly what the code aims to do.
- Add a description to provide more detailed information about the feature.
- You may assign people to review your code. When contributing to the code base, it is usually ideal to assign your mentors or someone with experience in related features as a reviewer.
![Create Pull Request]()
Press the "Create Pull request" when ready. This pull request should now be visible in the pull requests tab in GitHub if done successfully.
If needed, you can still commit new changes after making a pull request.
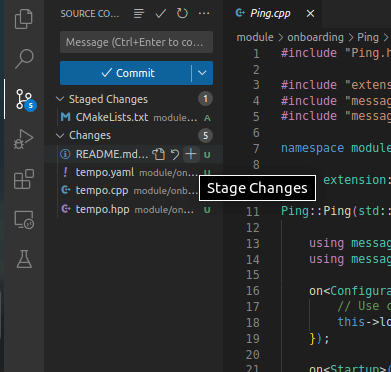
When committing more changes such as new code or new files, navigate to the source control tab, hover over the files that you would like to commit the changes of, then click the + button to stage the changes. When you're ready, add an informative commit name and press the Commit button. Then click Sync to push the changes to the cloud.
![Commit Changes]()
An easy way to commit and push all your changes to tracked files is to run the following commands in the terminal:
git commit -am "Descriptive commit message"git pushAlways remember to push your changes to the cloud after committing them. If you don't, your changes will only remain on your local machine and will not be visible to others.
Main task
For this task, we aim to evaluate the expression:
where n is the number of iterations, and define it as . Note that evaluating this expression is trivial, as one can implement the shortcut by using or using an iterative algorithm instead, but that wouldn't help you to get familiar with the NUbots codebase! As such, we will be introducing requirements and constraints.
Requirements
The code must be written in C++, using NUClear.
The code must be compiled and installed into a robot.
Once the right answer has been derived, one must emit that answer. If the correct answer was emitted, the robot should nod yes.
You must use at least 3 modules to implement their solutions. Why?
- One will start the reaction, one will determine when to stop sending the message to the other reactor and start emitting the final answer, and one will process the final answer and send the NodYes command.
- Decoupling is very important for code reliability and robustness. It also helps to make your code easy to review.
You must make your own branch and submit your code as a pull request for review once finished.
Constraints
You cannot use a
forloop or awhileloop to evaluate the expression.You cannot use the proposed shortcut to evaluate the expression
Only
on<Trigger<...>>andemit()statements should be used.
Recommendations
Use
./b module generate <absolute module path and name>to generate your modules. A full path example could be something liketest/onboarding_task.Use the NUClear role from the start for this task and a starting point. It looks like
nuclear_role(extension::FileWatchersupport::logging::ConsoleLogHandleractuation::KinematicsConfigurationplatform::${SUBCONTROLLER}::HardwareIOinput::SensorFilterextension::Directoractuation::Kinematicsactuation::Servosonboarding::Pingonboarding::Pongonboarding::Judge)They say that naming things is one of the hardest tasks in software engineering. What should the names of your modules be? Should they still be Ping and Pong? Can you think of more suitable names? What about your the names of your messages, i.e., your
.protofiles?NUbook will have all the information you need, and then some. This task cannot explain NUClear in its full glory, but it should be enough to enable members to contribute to the code base as soon as possible. If you wish to know more, you must learn to read documentation and if you are still stuck, don't hesitate to ask questions.
When in VS Code, press CTRL + Shift + F to find code snippets. This is particularly useful if members want to know how a specific bit of code should be used or how it is implemented. This will be specifically useful when looking at where to put your files in. For example, proto messages should lie in shared/messages/... and modules should lie within modules.
Once the code writing activity is finished (congrats!), ask an experienced team member for assistance with flashing the robot with your compiled binaries. This involves running ./b install n<nugus id> to upload your program, connecting to your chosen robot with ssh nubots@10.1.1.<nugus id>, and then running the binary by entering ./test/onboarding.


